Design Tool Basics: Design Center

Most of your time in the design tool will be spent on the design stage (where the visual of your solution appears) and in the control panel directly to the right of the design stage. In this article, we will refer to this section as the “Design Center.” Why? Because it’s the powerhouse of our tool, packed with easy-to-add templates, helpful accessories, quick access to our professional design team and so much more. Here’s a quick snapshot of what is included in the Design Center.

Name Your Design: Title your masterpiece so you can easily find it later in your account. Simply enter a name and click “Save.”

View Price: As you design, the price of your solution will update in real time. No sticker shock here!
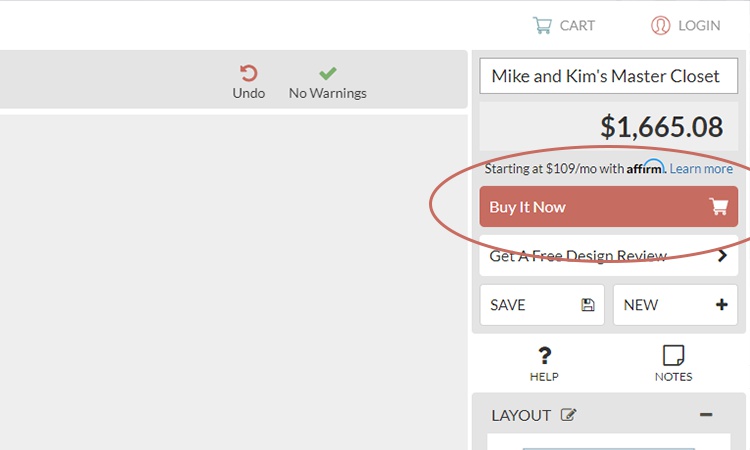
Buy Now: Happy with the solution you’ve created? Add it to your cart and purchase it! You will be asked to confirm your design choices prior to checkout.

Get a Free Design Review: The beauty of EasyClosets is that we love designing practical, custom organization solutions alongside you. Want our professional design team to take a look at what you have created? Submit a Design Review Request and we’d be happy to help. Your personal design assistant will follow up with you to make sure your design maximizes your available storage space.

Save Current Design: Save your progress by clicking the “Save” button periodically. If you don’t have an EasyClosets account, you will be asked to create one. You can then access all your saved designs in your account at any time. Our tool will auto-save your design changes once you are logged in.

Start a New Design: Want to start over or begin designing a new space altogether? Select the “New” button to get started. Be sure to save the design you’re currently working on first though!

Access Help Section: Looking for some assistance in understanding our design tool? Access our help hub here and find video tutorials, examples, and more.

View and Edit Design Notes: The “Notes” section is most often used if you choose to work with a professional EasyClosets designer. Our team will add comments and helpful resources that reference your design.

View Overhead Layout: The overhead layout view of your space is a great way to reference which area you are currently designing. The wall you’re working on will be highlighted in blue. You can quickly start working on another wall in your design by clicking on it in the overhead layout view.

Edit Wall & Section: When designing your space, the lower right side of your screen will display a variety of edit options depending on which level of the tool you are using at the time. For instance, if you are on the “Wall View” of your space (indicated by the highlighted bubble on the left side of the design stage), you can add and change elements of the wall itself. This includes editing wall pitch points to account for a sloped ceiling and adding obstructions like a window or vent. If you are editing in the “Section” view, you will notice the lower part of the right menu fill with organization templates for simple and speedy design.

Accessories: Want to add a helpful extra to your solution? View your options and select any accessory you would to have included with your order.

Select Wall:
While you’re designing a solution, you can easily switch between the walls in your space by selecting them in the lower right corner of your screen. Click “View All” to see every wall appear on the design stage.
Want more tips and tricks? Check out more tutorials and articles here.
